Working with actions
Learn how to define custom JavaScript actions with inputs, events, and cleanup functions to add specialized capabilities to your Nordcraft workflows.
For a demo of how to create and use a custom action in Nordcraft, check out the following lesson from the Nordcraft Fundamentals video course.
Create an action
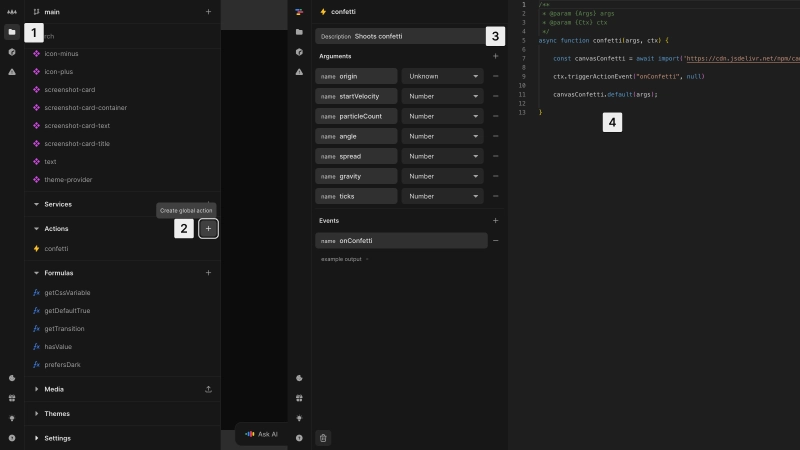
To create an action:
- 1Open the project sidebar by clicking the folder icon or using Cmd/Ctrl + K
- 2Locate the Actions section, click the + button and enter a name
- 3Add a short description for your action
- 4Write your JavaScript code in the code editor
An action must contain a function with the same name as the action itself. This is the entry point.
Custom actions have a specific structure with an entry function that receives two parameters:
args: contains all inputs passed to the actionctx: provides access to Nordcraft-specific functionality
The function can return a cleanup function that will be called when the component unmounts.
Configure inputs
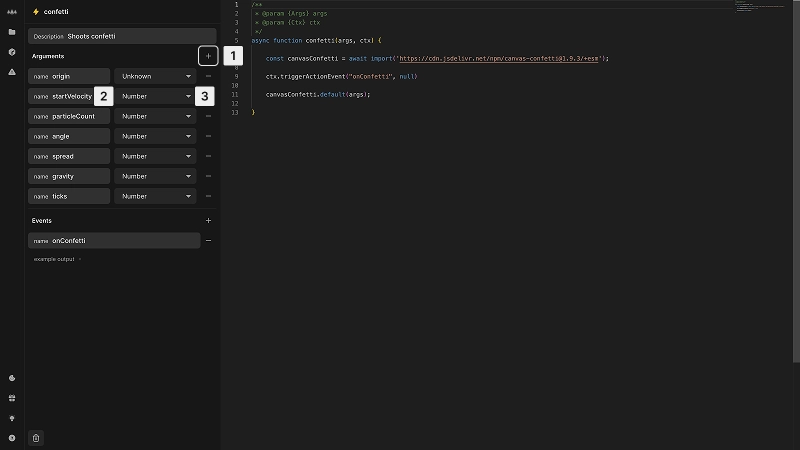
To add inputs to your action:
- 1Click the + button in the Inputs section
- 2Enter a name for the argument
- 3Select the argument type from the dropdown (
String,Number, etc.)
In your code, access these inputs through the args parameter, using the names you defined. If you have an input named value, access it in the code editor using args.value.
Set up events
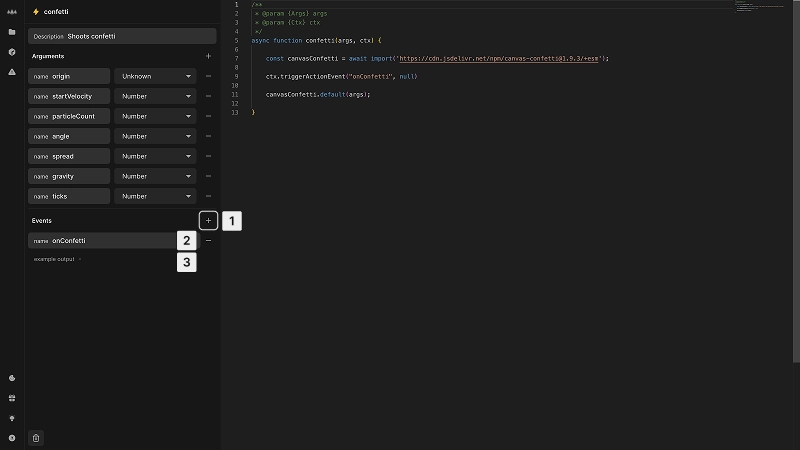
To create events that your action can trigger:
- 1Click the + button in the Events section
- 2Enter a name for the event
- 3Optionally provide example output to define the data structure
In your code, you can trigger events using the context object's triggerActionEvent method with the event name and data. When using the action in a workflow, you can then handle these events by adding actions to them.
For example, to trigger an event named update_user in your action, use triggerActionEvent("update_user", data) where data is an object that has been passed as an argument into the action, which you can modify in the action if necessary.
Action capabilities
When developing actions, keep these important considerations in mind:
- Client-side only: Actions run in the browser only (client-side), not during server-side rendering
- DOM access: Use
ctx.rootinstead ofdocumentfor DOM operations to ensure compatibility with Shadow DOM when components are exported as web components - Asynchronous code: Actions can be asynchronous using the
async/awaitsyntax or Promises - Cleanup: Return a function from your action to automatically clean up resources when the component that triggered the action is unmounted (e.g. remove event listener)
- Error handling: Actions should handle errors gracefully to avoid breaking your website
When you set up ongoing processes like intervals or event listeners in your actions, always return a cleanup function to avoid memory leaks.
Use an action
Custom actions can be used just like built-in workflow actions. When creating a workflow, you can add your custom actions as nodes by selecting them from the Project Actions section. You can provide values for any inputs defined in the action and handle any events it might trigger.
Here is an example of a custom action in Norcraft. It demonstrates how the canvas-confetti library can be integrated to create a celebratory effect when triggered.
This button triggers a confetti animation using a custom action. The action imports the canvas-confetti library and executes it when triggered. Shoot Confetti to see the action in effect.
Be cautious when pasting code snippets from external sources into custom actions. Custom code can execute any JavaScript you add, which may introduce security vulnerabilities if you do not trust the source.