Working with variables
You can use variables to manage state throughout your website, allowing you to create dynamic and interactive experiences.
Creating variables
To create a variable:
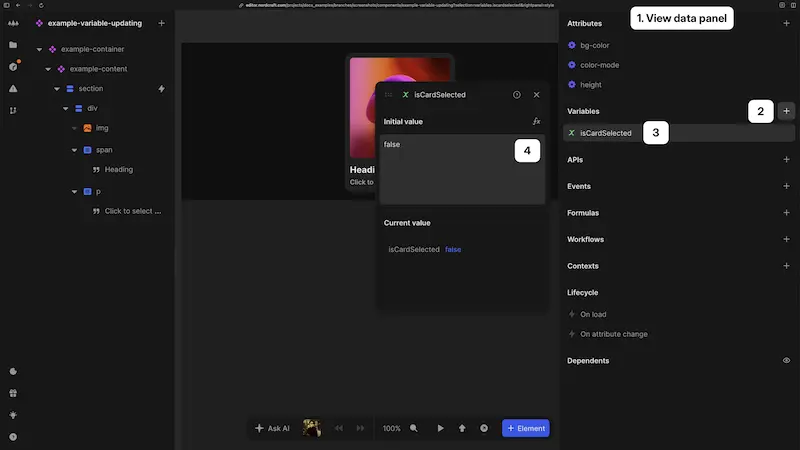
- 1Open the data panel with no element selected
- 2In the Variables section, click the + button
- 3Enter a name for your variable in the right panel
- 4Set an initial value in the dialog (can be a static value or formula)
Initial value
When you create a variable, its default initial value is null. You can either keep this default value or specify a different initial value:
- Static values: You can directly enter text, numbers, booleans, arrays and JSON objects etc.
- Formula-based values: Click the fx button to open the formula editor to create a dynamic initial value
The initial value provides a starting state for your component, determines the data type of the variable, and ensure it has a known value before any updates are made.
The variable type is automatically inferred when you set the initial variable value (e.g. Number, String, Array, Object or Boolean).
Initialization examples:
0creates a numeric variable""(empty string) creates a string (text) variable[]creates an array variable{}creates an object variabletrueorfalsecreates a boolean variablenullis the default and can be used when the actual value will be set later
When using a formula to set the initial value, you can reference attributes but not API data. This is because API data is not available when the variable initializes.
For API-dependent variables, set an initial value like null and update the variable after the API call completes using the On success event.
Updating variables
Binding variables
You can bind variables to element properties to have the variable update automatically when any changes are made to that element.
To bind a variable:
- 1Select the element in the element tree
- 2Find the property you want to bind
- 3Click the fx button next to the property
- 4In the formula editor, select your variable from the available options
- 5Add any additional logic if needed (transformations, conditions, etc.)
You can bind variables to various aspects of elements:
- Attribute values (
text,src,href, etc.) - Classes (see conditional styling)
- Show/hide functionality (with boolean conditions)
- Repeat formulas (using arrays to generate multiple elements)
- Workflows and actions (as inputs or conditions to control logic)
Input field binding
For input elements, Nordcraft provides a shortcut to create two-way binding with variables:
- 1Select an input element in the element tree
- 2In the attributes panel, find the
Bind to variabledropdown - 3Choose an existing variable or create a new one
This is a shortcut that automatically sets up:
- A binding of the variable to the input's
valueattribute - A change event handler on the
inputevent that updates the variable when the user types
The Bind to variable dropdown is a shortcut for single input fields, not for:
- groups of input fields (such as
optioninputs) - input fields that share the same
nameattribute (such as radio buttons)
If you're using other form input types such as radio, checkbox, or select inputs, you will need to manually add change event handlers to set variable values instead of choosing the Bind to variable shortcut.
Additionally, in the attributes panel you can configure checked or selected attributes for those input field types using the Formula editor.